Preface
This is a working-draft that has not been peer-reviewed. It is not yet complete and may change in the future.
About
The ImpEx plugin provides a modern way to import and export data from WordPress.
It provides
-
a WordPress REST API extension for importing and exporting data
-
a WordPress admin page for interacting with the ImpEx WordPress REST API.
-
a CLI for importing and exporting WordPress data from the command-line. You can use the CLI to interact with a remote WordPress installation.
-
an easy way to extend the import/export capabilities by third-party plugins based on WordPress actions and filters
Development
The sources of this plugin are maintained at the Impex WordPress plugin GitHub repository.
2022-08
Did you know : ImpEx can import / export Elementor pages out of the box
ImpEx can import and export pages operated by Elementor.
ImpEx is a free and fully open sourced WordPress Import/Export plugin.
Release 1.4.1
-
This release features a more user oriented UI simplifying the Import / Export :
-
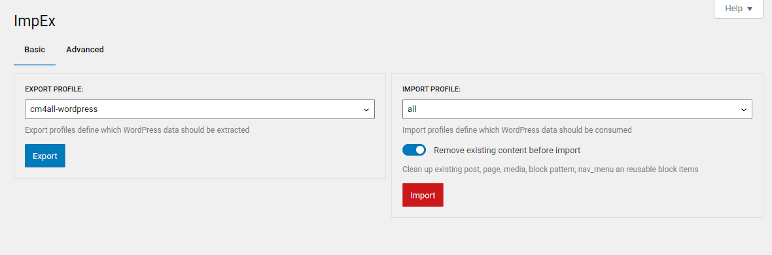
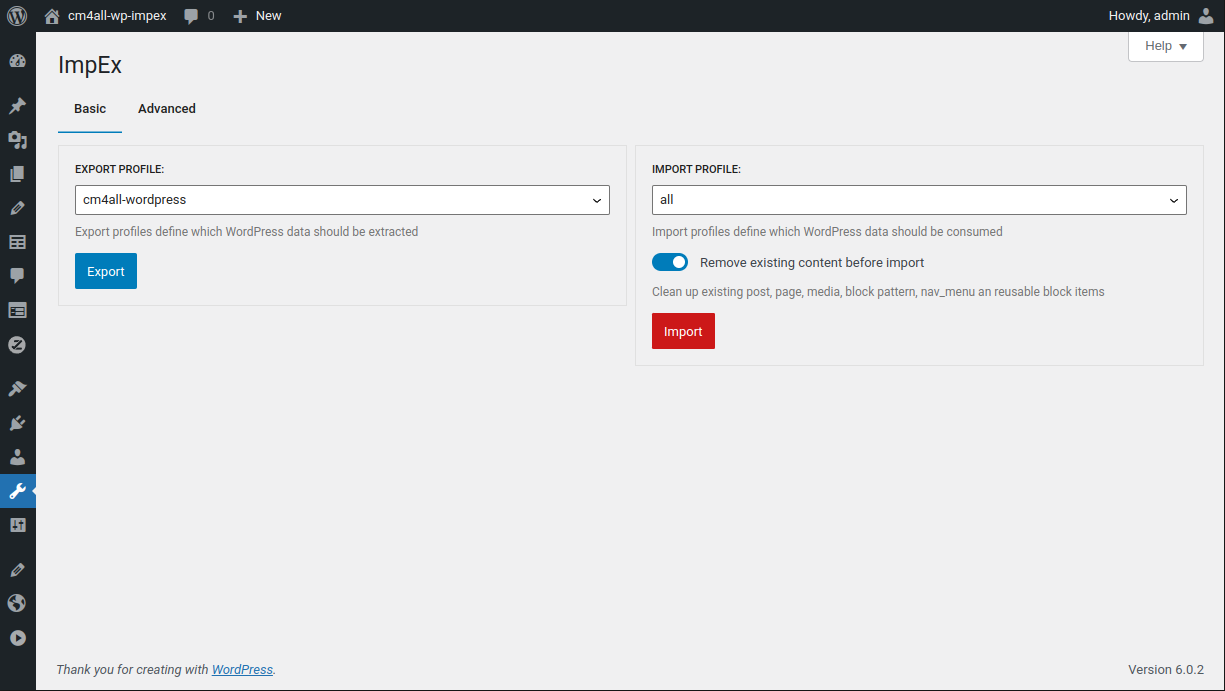
new additional import option to cleanup existing content (
post,page,media,block pattern,nav_menuansreusable blockitems) before processing the import data -
the local export folder name can be customized before download
-
watch a full video walkthroughh of the simple UI
-
-
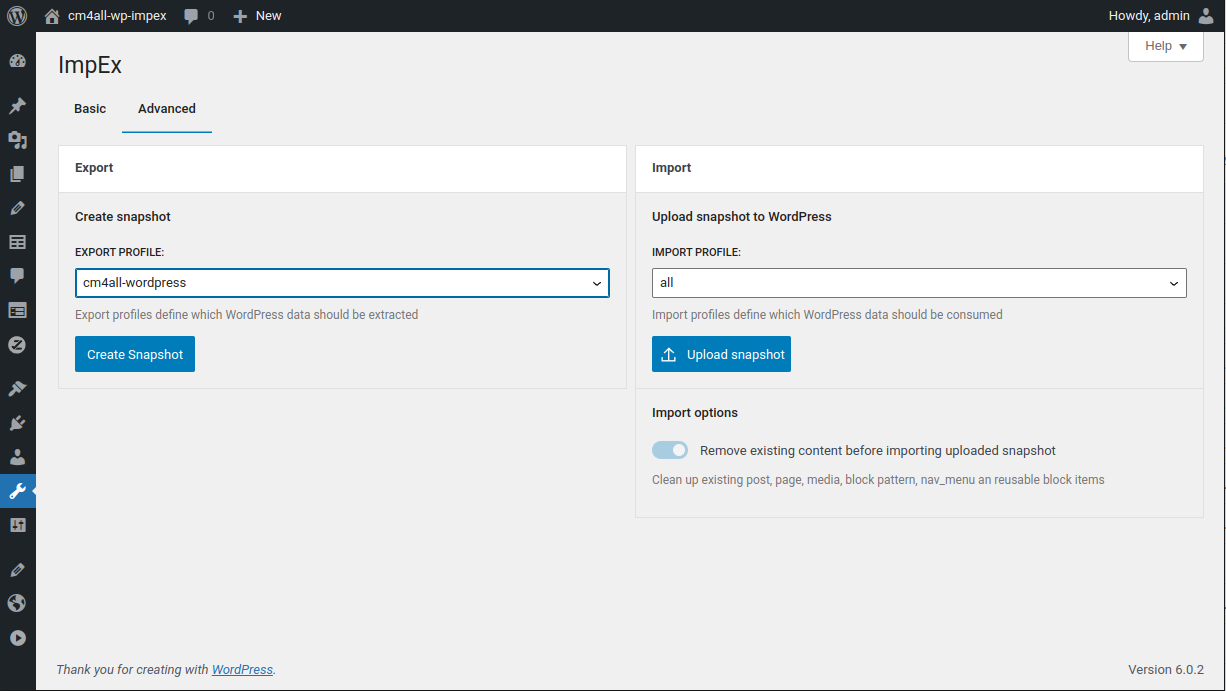
the (developer centric) ImpEx UI of previous ImpEx versions is also available in a second tab :
-
Import UI: if only a single Import profile exists, it is preselected
-
Export UI: if only a single Export profile exists, it is preselected
-
PHP API: ImpEx supports a 2 WordPress filters to customize the available Import/Export profiles listed in the UI
Features
There are a lot of WordPress plugins offering Import Export capabilities.
ImpEx stands out with some unique features making it the perfect match for WordPress data management.
There ist built-in support for exporting/importing
-
WordPress posts, pages, comments, categories, tags, custom post types, custom fields, users, taxonomies, navigation menus and more
-
FSE related content like block patterns, global styles, templates and template parts
-
WordPress media
For exporting additional data like third-party WordPress plugin settings or any other data, you can use the ImpEx API to configure your own Export profiles.
JSON export data format
ImpEx exports data in a JSON format.
The data structure can be validated using the provided ImpEx JSON Schema definitions (can be found here).
Semantic versioning support
The ImpEx JSON Schema format has built-in semantic versioning support providing upgrade capabilities for older exported content.
JSON Schema
The data format of ImpEx exports is described in the ImpEx JSON Schema definition files.
There are a variety of tools for working with JSON Schema.
Extensibility
ImpEx provides a foundation of core functionality to easily integrate custom WordPress data into the export
Third-party data integration
Third-party WordPress plugins and themes often persist data in custom database tables, wp_options or other data sources.
ImpEx provides WordPress actions and WordPress filters to integrate custom data into the export.
Third-party plugins can easily contribute their own data provider by registering actions and filters with ImpEx.
A ImpEx Data Provider is a import /export definition exposes plugin data to be used by other developers to integrate the data in their own export.
API
Custom profiles can be defined using the ImpEx API.
That does not mean that your own code depends on the ImpEx plugin to be installed and active. ImpEx uses WordPress actions and WordPress filters, so your plugin will also work fine is ImpEx is not installed.
The ImpEx API provides interfaces for
-
Data provider
Data provider expose data (Export) or consume data (Import). Typically a third-party plugin will register a Import Provider and Export Provider to ImpEx. Theses providers can be used by ImpEx profiles to integrate the plugin data into export and import.
-
Profiles
A ImpEx profile is a set of configuration options and tasks defining what data to export/import.
ImpEx provides a foundation of helpers to create custom ImpEx profiles with a few lines for posts, database tables and wp_options.
Managed WordPress support
If you operate your WordPress website using a managed WordPress hosting service, you often have limited or no direct access to the WordPress database / installation.
In these scenarios most WordPress Import / Export plugins will not work.
ImpEx only needs access to the WordPress REST API. Works like a charm in almost any managed WordPress hosting environment.
Commandline interface (CLI)
wp-cli is a great tool for managing WordPress installations. Unfortunately it needs direct access to the WordPress installation and database.
Thus ImpEx provides a CLI interface to interact with a WordPress installation using pure WordPress REST API. The ImpEx CLI works perfectly on managed WordPress instances.
REST API support
ImPEx provides a WordPress REST API extension for importing and exporting data. All ImpEx functions are available as REST API endpoints.
Scalability
It's easy to export a WordPress website with a few pages. But about a WordPress website with a lot of pages and hundreds of images ?
ImpEx is designed to be scalable. It can can handle hundreds/thousands of pages/posts and media files from scratch.
Streaming API
ImpEx API is designed to import/export a WordPress website in chunks of slices.
A chunk is a partial unit of the exported data. Its basically a directory containing a part of the exported slices. Each slice is a json file describing (and most times also containing) data like post(s) or any other WordPress data.
The API ist designed to be resumable. A aborted export (and even import) can be resumed at any time.
cancel/resume support will be part of a future release.
Import Framework for websites from third-party website builders
ImpEx is also a great choice to import a website from a third-party website builder or even a static website.
ImpEx provides a NodeJS Framework to convert any existing content to ImpEx WordPress content : @cm4all-wp-impex/generator.
Using @cm4all-wp-impex/generator you can convert html pages or any other content to WordPress content.
Since this package provides an API you can easily add custom transformations to suppport third-party site builder specialties into valid ImpEx export data.
Generating custom content
Even more, @cm4all-wp-impex/generator allows you to transform any data from anywhere into WordPress content.
There ist actually no limit - everything can be transformed into WordPress content using @cm4all-wp-impex/generator. See the Static website conversion tutorial as a starting point.
Basic usage
ImpEx separates Import and Export in 2 steps using the ImpEx Dashboard screen.
Export
-
You need to create a snapshot first.
The snapshot will contain the current data (defined by the used ImpEx profile) of the WordPress instance.
-
Now you can download the snapshot to your local machine.
Import
-
Upload snapshot from your local machine to the WordPress instance.
Uploading does not modify your current WordPress contents.
-
If you now import the snapshot, the contents of your WordPress instance will be updated with the snapshot data.
Using the impex-cli command line tool will combine both steps in one. You just export or import a local directory containing the snapshot in ImpEx Export Format. impex-cli manages the temporary snapshot handling for you.
CLI
ImpEx provides a command-line tool to interact with the ImpEx plugin remotely using WordPress HTTP REST API.
Using this tool you can import and export data from and to a remote WordPress installation.
impex-cli works also fine at most managed WordPress installations since it does not need direct WordPress access like wp-cli.
Prerequisites
ImpEx CLI requires PHP 7.4 or higher and the php-curl extension.
Installation
ImpEx CLI is available at the ImpEx release page.
Download the 'ImpEx CLI' archive and extract its contents.
The ImpEx CLI is provided in 2 flavors :
-
impex-cli.phpneeds at least PHP 8.0 -
impex-cli-php7.4.0.phpis transpiled to be PHP 7.4 compatible
Linux/MacOS Users may mark the impex-cli files as executable by running
chmod +x *.phpfor better usability.
If you do not have the right PHP version installed on your machine but want to play with the ImpEx CLI you can give the official PHP Docker image a try (Assuming your working dir contains the extracted impex-cli php files and impex-cli options needs to be adjusted to your needs) :
Using the official PHP 7.4 Docker image :
docker run \
  -it \
  --network host \
  --rm \
  -v "$PWD":/usr/src/myapp \
  --workdir /usr/src/myapp \
  php:7.4-cli \
  php \
  impex-cli-php7.4.0.php \
    export-profile \
    list \
    -username=<adminuser> \
    -password=<password> \
    -rest-url=http://localhost:8888/wp-json
Alternatively using the PHP 8.0 image:
docker run \
  -it \
  --network host \
  --rm \
  -v "$PWD":/usr/src/myapp \
  --workdir /usr/src/myapp \
  php:8.0-cli \
  php \
    impex-cli.php \
    export-profile \
    list \
    -username=<adminuser> \
    -password=<password> \
    -rest-url=http://localhost:8888/wp-json
Syntax
impex-cli.php operation sub-operation? -rest-url=[wordpress-restapi-url] [options] [arguments]?
Common options and flags
Some of the impex-cli options are common to all operations.
Options
Options are command-line arguments consisting of key and value.
The value can be wrapped within " or '.
rest-url
The rest-url option as always required for all impex-cli operations (except help) since it specifies the remote WordPress installation to interact with.
A typical rest-url value in a wp-env development environment is http://example.com/wp-json/.
Please ensure that the remote WordPress installation has the REST API enabled. Otherwise impex-cli is unable to communicate with the installation.
username and password
If you can access your WordPress installation using username and password credentials via HTTP Basic Auth, you can use the --username and --password options to specify them.
Example:
impex-cli.php export-profile \
  -username=<adminuser> \
  -password='<password>' \
  -rest-url=http://example.com/wp-json
By providing the credentials via
usernameandpasswordoptions impex-cli will authenticate against the remote WordPress installation using the HTTP BASIC AUTH method.
HTTP Headers
You can provide as many HTTP headers as you like to impex-cli. All HTTP headers are passed to every request as is.
Example:
impex-cli.php export-profile \
  -H="X-foo=bar" \
  -H="X-myrealm=cheers" \
  -username=<adminuser> -password='<password>' \
  -rest-url=http://example.com/wp-json
Flags
Flags are command-line arguments consisting of just a name.
verbose
Enable verbose log output.
Example:
impex-cli.php export-profile \
  -verbose \
  -username=<adminuser> -password='<password>' \
  -rest-url=http://example.com/wp-json
CURLOPT_VERBOSE
Enable verbose CURL output.
This flag will result in a lot of output and is therefore not recommended for normal use.
Example:
impex-cli.php export-profile \
  -CURLOPT_VERBOSE \
  -username=<adminuser> -password='<password>' \
  -rest-url=http://example.com/wp-json
Authentication
If your WordPress installation does not use HTTP Basic Auth, you need to authenticate using HTTP headers.
Since impex-cli supports additional header options you're a lucky winner.
Example (doing HTTP Basic Auth using plain HTTP headers):
impex-cli.php export-profile \
  -H='Authorization: Basic YWRtaW46cGFzc3dvcmQ=' \
  -rest-url=http://example.com/wp-json
Operations
export
The export operation exports and downloads data using the ImpEx plugin of the WordPress installation.
A ImpEx export results in a directory structure containing
-
JSON Files for structured data
WordPress content will be stored in plain JSON files called slices. This gives you also the option to transform the content locally before re-importing them somewhere else.
-
Blobs for attachments/media
Attachments and media will be saved "as is" to the local filesystem. So if you have a
jpgattachment in your WordPress installation it gets exported also as ajpgfile beside its slice.
Example:
impex-cli.php export \
  -username=<adminuser> -password='<password>' \
  -rest-url=http://localhost:8888/wp-json \
  -overwrite \
  -profile=base \
  ~/tmp
After execution the target directory contains a new directory with the exported data:
export-cm4all-wordpress-created-
├── chunk-0001
│   ├── slice-0000.json
│   ├── slice-0001.json
│   ├── slice-0001-logo-fabrics.png
│   ├── slice-0002-johny-goerend-ou-GkKJm3fc-unsplash.jpg
│   ├── slice-0002.json
│   └── slice-0003.json
...
├── chunk-0006
│   ├── slice-0000.json
│   ├── slice-0001.json
│   ├── slice-0002.json
│   ├── slice-0003.json
│   ├── slice-0004.json
│   ├── slice-0005.json
│   ├── slice-0006.json
│   ├── slice-0007.json
│   ├── slice-0008.json
│   └── slice-0009.json
└── chunk-0007
    ├── slice-0000.json
    └── slice-0001.json
All export data files are split over
chunk-*directories) to prevent getting a single directory containing too much files slowing down file managers like Windows Explorer.
profile option
An ImpEx export profile defines what data should be exported.
To get a list of available ImpEx export profiles see impex-cli operation
export-profiles
You will usually use the predefined 'base' export profile exporting pages/posts/attachments and all FSE data like templates/reusable blocks and stuff.
overwrite flag
The export operation will abort in case of an existing ImpEx export directory. Using the overwrite flag you can force deletion of the existing directory before export.
directory argument
The directory argument specifies the export target directory.
The export operation will create a top-level directory in the specified directory and stores everything else in chunk subdirectories.
import
The import operation imports an ImpEx export from the specified directory into the remote WordPress installation.
Example usage:
impex-cli.php import \
  -username=<adminuser> -password='<password>' \
  -rest-url=http://localhost:8888/wp-json \
  -options='{"impex-import-option-cleanup_contents" : true}'
  ~/tmp/my-export
This snippet will
- upload the whole exported data in the directory
- import them using the
allprofile at the WordPress installation.- the
impex-import-option-cleanup_contentsoption will cleanup existing post, page, media, block pattern, nav_menu and reusable block items right before starting the import.
- the
profile option
An ImpEx import profile defines what data should be imported. If not provided, the import will fallback to default import profile all.
To get a list of available ImpEx import profiles see impex-cli operation
import-profiles
directory argument
The directory argument specifies the directory where the import data resides.
The directory argument takes the directory path created by the
exportoperation.
options argument
The options argument let's you provide ImpEx import options. The options value is expected to be an associative JSON object.
Valid options are :
-
impex-import-option-cleanup_contentsYou may want to cleanup your WordPress content right before import. That's what the
impex-import-option-cleanup_contentsoption is made for. If this option is set totrueImpEx will remove any- post
- page
- media
- block pattern
- nav_menu
- reusable block
item right before starting the import.
export-profiles
list
Lists all available export profiles in JSON format.
Example usage:
impex-cli.php \
  export-profile \
  list \
  -username=<adminuser> -password='<password>' \
  -rest-url=http://localhost:8888/wp-json
Example output (may vary for your installation):
[
  {
    "name": "base",
    "description": "Exports posts/pages including media assets"
  },
  {
    "name": "cm4all-wordpress",
    "description": "Exports posts/pages/media-assets and plugin data of [cm4all-wordpress,complianz-gdpr,ninja-forms,ultimate-maps-by-supsystic] if these plugins are enabled"
  },
  {
    "name": "impex-export-profile-example",
    "description": "Exports posts/pages/media-assets and plugin data of [cm4all-wordpress,complianz-gdpr,ninja-forms,ultimate-maps-by-supsystic] if these plugins are enabled"
  }
]
import-profiles
list
Lists all available import profiles in JSON format.
Example usage:
impex-cli.php \
  import-profile \
  list \
  -username=<adminuser> -password='<password>' \
  -rest-url=http://localhost:8888/wp-json
Example output (may vary for your installation):
[
  {
    "name": "all",
    "description": "Import everything"
  },
  {
    "name": "impex-import-profile-example",
    "description": "Import everything example with event listener"
  }
]
help
Prints the impex-cli help.
Migrating content
Migrating existing content into WordPress is a very common task.
ImpEx provides tooling support for migrating data to WordPress.
Preparation
ImpEx imports data from a directory containing JSON files organized in chunk-\* sub-directories.
my-exported-website
├── chunk-0001
│   ├── slice-0001.json
│   ├── slice-0002.json
│   ├── slice-0003.json
│   ├── slice-0004.json
│   └── slice-0005.json
├── chunk-0002
│   ├── slice-0001.json
│   ├── slice-0001-wes-walker-unsplash.jpg
│   ├── slice-0002-greysen-johnson-unsplash.jpg
│   ├── slice-0002.json
│   ├── slice-0003-james-wheeler-unsplash.jpg
│   └── slice-0003.json
...
Why that chunk-* sub directory structure ?
Organizing thousands of content documents and hundreds of images/videos in a single directory slows down file managers like Windows Explorer. That's the one and only reason for
chunk-\*sub directories.
Both chunk-* sub directories and the JSON files are suffixed by a 4 digit number.
ImpEx imports slice files ordered by name. So the slices in sub directory chunk-0001 will be imported first, then the slices in chunk-0002 and so on.
Same rule for slice-*.json files within the same chunk-\* sub directory : slice-0001.json will be imported before slice-0002.json and so on.
Knowing that import order is important. If you import content referencing images/videos in the wrong order, you will get broken links in your posts. ImpEx will rewrite/fix media links in the content if you import content as first and media afterwards.
Have a look at this sample ImpEx export provided by the ImpEx plugin to get a clue about a minimal working ImpEx export containing content and referencing images.
Data files
slice-*.json files are JSON files containing data.
The real data is stored in the data property.
The data might be anything expressed in textual form. Beside the data itself, each slice-*.json file contains some meta-data describing the contained data so that ImpEx knows how to import.
An minimal slice file transporting a single WordPress post looks like this:
{
  "version": "1.0.0",
  "type": "php",
  "tag": "content-exporter",
  "meta": {
    "entity": "content-exporter"
  },
  "data": {
    "posts": [
      {
        "wp:post_id": 1,
        "wp:post_content": "<!-- wp:paragraph -->\n<p>Hello from first imported post !</p>\n<!-- /wp:paragraph -->",
        "title": "Hello first post!"
      }
    ]
  }
}
As you can see the real content is located in the data property.
Everything except the data property ist used for versioning and content identification.
Content (aka WordPress posts/pages)
Content slice files wrap regular WordPress posts and pages.
Content slices may also transport further content like comments, custom fields, terms, taxonomies, categories, FSE templates/template-parts, global styles and so on. But that's another story.
To get a clue about the power of content slices by exporting a FSE enabled WordPress instance and inspecting the resulting
slice-_.jsonfiles.
Below is the JSON Schema describing the content slice file format.
Download JSON Schema definition for content slices : slice-content.json
{
  "$schema": "http://json-schema.org/draft-07/schema",
  "title": "ImpEx Content Slice",
  "description": "a ImpEx slice containing content",
  "type": "object",
  "properties": {
    "$schema": {
      "type": "string",
      "description": "The JSON schema for this slice"
    },
    "version": {
      "title": "ImpEx Provider content version",
      "description": "Version will be used by ImpEx to know what data format to expect",
      "const": "1.0.0"
    },
    "type": {
      "title": "ImpEx slice type",
      "description": "Value will be used by ImpEx to know the content type of the slice",
      "const": "php"
    },
    "tag": {
      "title": "ImpEx slice tag",
      "description": "The ImpEx slice tag contains information about the responsible ImpEx provider for this slice",
      "const": "content-exporter"
    },
    "meta": {
      "title": "Metadata for the slice",
      "description": "Metadata is a JSON object used to store additional information about the slice",
      "const": {
        "entity": "content-exporter"
      }
    },
    "data": {
      "type": "object",
      "properties": {
        "posts": {
          "type": "array",
          "items": {
            "$ref": "#/definitions/posts-item"
          },
          "minItems": 1,
          "$comment": "@TODO: unique ids are not yet supported by jsonschema",
          "uniqueItems": true
        }
      },
      "title": "Data portion of this ImpEx slice",
      "description": "data contains the real ImpEx data.",
      "required": ["posts"]
    }
  },
  "additionalProperties": false,
  "required": ["version", "type", "tag", "meta", "data"],
  "definitions": {
    "posts-item": {
      "title": "WordPress posts stored in this this ImpEx slice",
      "type": "object",
      "properties": {
        "wp:post_id": {
          "type": "integer",
          "minimum": 1,
          "title": "WordPress post_id",
          "description": "The unique WordPress post id of the post"
        },
        "title": {
          "type": "string",
          "minLength": 1,
          "title": "WordPress post title",
          "description": "The title of the WordPress post as it is stored in the database"
        },
        "wp:post_content": {
          "type": "string",
          "minLength": 1,
          "title": "WordPress post content",
          "description": "The content of the WordPress post",
          "examples": [
            "<!-- wp:paragraph -->\n<p>Hello from first imported post !</p>\n<!-- /wp:paragraph -->",
            "<!-- wp:paragraph -->\n<p>Hello world</p>\n<!-- /wp:paragraph -->\n\n<!-- wp:html -->\n<p>A bit of custom html utilizing the Gutenberg html block</p>\n<ul>\n  <li>hi</li>\n  <li>ho</li>\n  <li>howdy</li>\n</ul><!-- /wp:html -->"
          ]
        },
        "wp:post_type": {
          "title": "WordPress post type",
          "description": "The type of the WordPress post.\nCcontent related post types are 'post' and 'page'.\nIf not declared, type 'post' will be assumed.",
          "type": "string",
          "enum": [
            "post",
            "page",
            "nav_menu_item",
            "wp_template",
            "wp_template_part",
            "wp_block",
            "wp_global_styles"
          ],
          "default": "page"
        },
        "wp:status": {
          "type": "string",
          "title": "WordPress post status",
          "description": "The WordPress post status (https://wordpress.org/support/article/post-status/)",
          "enum": ["publish", "future", "draft", "pending", "private"],
          "default": "draft"
        },
        "wp:post_excerpt": {
          "type": "string",
          "title": "WordPress excerpt",
          "description": "The excerpt of the post.",
          "minLength": 1
        },
        "wp:post_name": {
          "type": "string",
          "title": "WordPress post slug",
          "description": "Used to generate the permalink. If not given, the sanitized post title will be used instead.",
          "minLength": 1
        },
        "wp:post_parent": {
          "type": "integer",
          "minimum": 1,
          "title": "WordPress post parent id",
          "description": "The WordPress post id of the parent post.\n If not given, the post will be created as a top level post."
        }
      },
      "required": ["wp:post_id", "title", "wp:post_content"],
      "additionalProperties": false
    }
  }
}
A content slice may contain any number of WordPress posts/pages/etc.
When generating a content slice file, it's best to embed only a single page/post per
slice-_.jsonfile
Each content document is identified by a unique wp:post_id property.
The title property is used as the title.
wp:post_content transports the content.
See the Content slice JSONSchema definition for all supported properties.
Since WordPress expects block-annotated HTML you need to transform your HTML content into block-annotated HTML.
There are 2 options to do that :
-
The gold solution : annotate almost every HTML tag with the matching Gutenberg block.
<!-- wp:paragraph --> <p>A bit of custom html utilizing the Gutenberg html block</p> <!-- /wp:paragraph --> <!-- wp:list --> <ul> <li>hi</li> <li>ho</li> <li>howdy</li> </ul> <!-- /wp:list --> <!-- wp:image --> <figure class="wp-block-image"> <img src="./greysen-johnson-unsplash.jpg" /> <figcaption>Fly fishing</figcaption> </figure> <!-- /wp:image --> -
the quick and dirty solution : wrap the whole html content into a WordPress Custom HTML block :
<!-- wp:html -->
<p>A bit of custom html utilizing the Gutenberg html block</p>
<ul>
  <li>hi</li>
  <li>ho</li>
  <li>howdy</li>
</ul>
<figure>
  <img src="./greysen-johnson-unsplash.jpg" />
  <figcaption>Fly fishing</figcaption>
</figure>
<!-- /wp:html -->
Why is this solution dirty ?
=> If you open up a page/post containing a - the quick and dirty solution : wrap the whole html content into a WordPress Custom HTML block in the Gutenberg editor, you will see just the HTML content but its not rendered. So the quick and dirty solution is actually a no-go from a designers perspective.
The HTML content must be encoded as JSON string in the slice file. See this example content slice.
See Attachments (like Pictures and Videos) for importing referenced media files.
Attachments (like Pictures and Videos)
Attachments a binary files like images/videos or anything else stored in the WordPress uploads directory.
Such binary data is handled a bit differently than textual - because it cannot be easily embedded into a JSON file.
Below is a JSON Schema describing the attachment slice file format.
Download JSON Schema definition for media files : slice-attachment.json
{
  "$schema": "http://json-schema.org/draft-07/schema",
  "title": "ImpEx Content Slice",
  "description": "a ImpEx slice containing content",
  "type": "object",
  "properties": {
    "$schema": {
      "type": "string",
      "description": "The JSON schema for this slice"
    },
    "version": {
      "title": "ImpEx Provider content version",
      "description": "Version will be used by ImpEx to know what data format to expect",
      "const": "1.0.0"
    },
    "type": {
      "title": "ImpEx slice type",
      "description": "Value will be used by ImpEx to know the content type of the slice",
      "const": "php"
    },
    "tag": {
      "title": "ImpEx slice tag",
      "description": "The ImpEx slice tag contains information about the responsible ImpEx provider for this slice",
      "const": "attachment"
    },
    "meta": {
      "title": "Metadata for the slice",
      "description": "Metadata is a JSON object used to store additional information about the slice",
      "type": "object",
      "properties": {
        "entity": {
          "title": "Entity",
          "description": "The entity type of this slice",
          "type": "string",
          "default": "attachment",
          "enum": ["attachment"]
        },
        "impex:post-references": {
          "title": "Array of urls referencing this attachment in posts",
          "description": "When the attachment was imported, all references in this array will be replaces by the url of the imported attachment",
          "type": "array",
          "items": {
            "type": "string"
          },
          "minItems": 1,
          "$comment": "@TODO: unique ids are not yet supported by jsonschema",
          "uniqueItems": true
        }
      }
    },
    "data": {
      "format": "uri-template",
      "type": "string",
      "title": "Data portion of this ImpEx slice",
      "description": "Attachment slice data is expected to be a URI to the attachment file.\nFor media it has to be the URI to the image.\nURI can be absolute or relative.",
      "examples": [
        "./media/image.jpg",
        "https://www.example.com/attachment.jpg"
      ]
    }
  },
  "additionalProperties": false,
  "required": ["version", "type", "tag", "meta", "data"]
}
Let's say you have a reference to an image in your content :
<img src="./greysen-johnson-unsplash.jpg" />
So you need to import the image into your WordPress instance. To do so, you need to
-
create a
slice-*jsonfile (let's name itslice-0002.json) declaring the attachment :{ "version": "1.0.0", "type": "resource", "tag": "attachment", "meta": { "entity": "attachment" }, "data": "./greysen-johnson-unsplash.jpg" }As you can see, there is actually only the
dataproperty referencing the image. Rest of the slice file is just meta-data. -
provide the image in the same chunk directory as it's slice json file and prefixed with the slice json file name (
slice-0002.json) :slice-0002-greysen-johnson-unsplash.jpg
If you import the slice file using ImpEx, the image will appear in the WordPress uploads directory and in the WordPress media page. If you referenced the image in your content, it will also appear in your imported pages/posts.
Remember: Content slices referencing media files should ALWAYS be imported before the attachment slices.
This can be achieved by naming content slicing with a lower number than the media slices or - much simpler - keeping the content slices in a lower numbered
chunk-*directory than the attachments.See simple-import example for a full featured manually written import at the ImpEx WordPress plugin GitHub repository.
Adjusting attachment urls
If you import posts referencing an image using relative paths, you will need to adjust the image url in your imported posts to the newly imported attachment.
Suppose you have various posts referencing an image in different ways :
<!-- sub/page-one.html -->
...
<img src="../images/greysen-johnson-unsplash.jpg" />

<!-- page-two.html -->
...
<img src="/images/greysen-johnson-unsplash.jpg" />

<!-- page-tree.html -->
...
<img src="./images/greysen-johnson-unsplash.jpg" />
After importing generated pages will reference exactly the same IMG src attribute, but the url of the imported image attachment will be different.
In this case you can configure replacing the original with the url of the imported image using slice meta property impex:post-references. This property tells ImpEx that the given references should be replaced with the url of the imported attachment file.
{
  "version": "1.0.0",
  "type": "resource",
  "tag": "attachment",
  "meta": {
    "entity": "attachment",
    "impex:post-references": [
      "../images/greysen-johnson-unsplash.jpg",
      "./images/greysen-johnson-unsplash.jpg"
      "/images/greysen-johnson-unsplash.jpg",
    ]
  },
  "data": "./greysen-johnson-unsplash.jpg"
}
Other data
Although ImpEx provides a simple way to import content and media, you may also want to import more advanced data like database tables or settings into WordPress.
ImpEx provides built-in support for further data :
-
relational data like database tables
-
key/value based settings (aka
wp_options)
@TODO: Add JSONSchema / examples for other data.
Package @cm4all-wp-impex/generator
@cm4all-wp-impex/generator simplifies the conversion of any content or website to WordPress using ImpEx WordPress Plugin.
- Details
- Installation
- Development
- Usage
This package provides a foundation of JavaScript functions/classes for transforming almost any kind of data into WordPress content.
@cm4all-wp-impex/generator is especially useful for converting bare HTML content and website-builder/CMS generated HTML into WordPress content.
The framework does not require a WordPress instance. It rather offers an extensible platform for generating WordPress content consumable by the ImpEx WordPress plugin.
ImpEx is a Open Source WordPress plugin for importing / exporting WordPress data.
@cm4all-wp-impex/generatoris part of the ImpEx WordPress plugin project.
Watch the tutorial on YouTube:
Details
The ImpEx WordPress plugin specifies a JSON file based import/export format for WordPress content).
@cm4all-wp-impex/generator provides
-
functionality for transforming data into Gutenberg block annotated HTML
-
support for creating ImpEx JSON files containing WordPress content (like pages/posts/templates/blocks/ patterns and so on) and WordPress attachments like images
-
functions to create file/folder structure expected by the ImpEx WordPress plugin
Last but not least @cm4all-wp-impex/generator includes a full featured example transforming a complete static website into WordPress content consumable by ImpEx WordPress plugin. The example is the perfect starting point for creating your own WordPress content generator.
Installation
npm install @cm4all-wp-impex/generator
Development
-
clone ImpEx WordPress plugin Git repository project :
git clone https://github.com/IONOS-WordPress/cm4all-wp-impex.git -
cd into the
@cm4all-wp-impex/generatorsub-project :cd packages/@cm4all-wp-impex/generator -
ensure the correct NodeJS Version (see https://github.com/IONOS-WordPress/cm4all-wp-impex/blob/develop/.nvmrc) is installed :
nvm install -
install package dependencies :
npm ci -
run the tests :
npm run test
tests
requirements
tests require the diff command to be available.
Usage
@cm4all-wp-impex/generator exposes an API for generating WordPress content.
API
To use the API just import the exposed API into your code.
import { ImpexTransformer, traverseBlocks, ImpexSliceFactory, migrate } from `@cm4all-wp-impex/generator`;
Transforming data into WordPress content
Data transformation into Gutenberg block annotated HTML
is done by the ImpexTransformer singleton.
ImpexTransformer can be configured by calling it's setup(...) function supporting various hooks for customizing the transformation.
ImpexTransformer.transform(data) transforms the content provided in the data argument into Gutenberg block annotated HTML.
ImpexTransformer.setup({/* options */})
Options
-
verbose(boolean, default :false) enables verbose output for debugging purposes -
onLoad(data : any) : string(function, default : undefined) callback executed bytransform(...)function.dataargument is the initial data to transform.This callback is intended to be used for converting the initial data into HTML.
Example: If your initial
datais markdown content this callback should transform it to HTML:... ImpexTransformer.setup({ onLoad(data) { return markdown.toHTML(data); } }); ...If
onLoadis not defined thetransformfunction will assume thedataargument is valid HTML. -
onDomReady(Document : document) : void(function, default : undefined) callback executed when HTML is loaded and the DOM is ready.At this stage, you can use the HTML DOM manipulation API (
querySelectorfor example) to rearrange the HTML DOM the way you need.The
Transformeruses JSDOM to provide DOM capabilities to NodeJS. So you can use everything you know about DOM manipulation in NodeJS.See tests for example usage.
-
onRegisterCoreBlocks() : boolean(function, default : undefined) callback to register Gutenberg blocks.This callback is the power horse transforming HTML to Gutenberg block annotated HTML.
Most transformation work is delegated to the Gutenberg Block Transforms API. This API processes the given DOM and applies the Gutenberg Block transformations of all registered blocks. The result is valid Gutenberg block annotated HTML as we want it.
Using the
onRegisterCoreBlockscallback you can register your own Gutenberg blocks (including their transform rules) or attach additional transform rules to existing core Gutenberg blocks utilizing Gutenberg filter 'blocks.registerBlockType'.If your
onRegisterCoreBlockscallback returnstrue, the core Gutenberg blocks transform rules will be reset to its defaults.If
onRegisterCoreBlocksis not given,transform(...)will assume that the core Gutenberg blocks should be used as-is.See tests for example usage.
-
onSerialize(blocks : array) : array(function, default : undefined) callback executed after the Gutenberg block transform rules have been applied.The resulting array of Gutenberg blocks is passed to the callback. The callback can modify the blocks array and is expected to return them.
Example transforming all Gutenberg Image block attributes into caption block attribute. This will result in a
<figcaption>element inside the block output:ImpexTransformer.setup({ onSerialize(blocks) { // takeover img[@title] as figcaption in every block for (const block of traverseBlocks(blocks)) { if (block.name === "core/image") { block.attributes.caption = block.attributes.title; delete block.attributes.title; } } return blocks; }, });traverseBlocksis a helper function exposed by this package to traverse the Gutenberg block hierarchy like a flat array.See tests for example usage.
ImpexTransformer.transform(data : any) : string
The transform function transforms the given data into Gutenberg block annotated HTML.
The data argument can be anything. All hooks configured using ImpexTransformer.setup(...) will take effect by executing this function.
The returned string is valid Gutenberg block annotated HTML.
Encapsulate Gutenberg block annotated HTML in ImpEx slice JSON data structure
To import the generated Gutenberg block annotated HTML into WordPress we need to generate ImpEx WordPress plugin conform JSON files wrapping the content with WordPress meta-data.
Class ImpexSliceFactory provides a simple way to generate WordPress ImpEx Slice JSON structures.
At first we need to create an instance of ImpexSliceFactory:
const sliceFactory = new ImpexSliceFactory({
  /* options */
});
There is just one (optional) option next_post_id : integer (default : 1) which might be used to provide a individual start post_id. next_post_id is only taken into account when creating content slices for WordPress content like posts/pages or media.
The ImpEx WordPress plugin supports some more slice types (for exporting whole database tables and more) but in these cases next_post_id is not in use.
Using the ImpexSliceFactory instance we've created we can now generate WordPress ImpEx Slice JSON structures for WordPress content or media by calling function createSlice(sliceType : string, callback(factory, sliceJson : any) : any).
The sliceType argument is the type of the slice to be created.
The callback function is called with the ImpexSliceFactory instance and the generated slice JSON structure as parameters .
Encapsulate WordPress content into ImpEx JSON
Creating the JSON for a WordPress post is dead simple :
const slice = sliceFactory.createSlice("content-exporter", (factory, slice) => {
  slice.data.posts[0].title = "Hello";
  slice.data.posts[0]["wp:post_content"] =
    "<!-- wp:paragraph --><p>my friend</p><!-- /wp:paragraph -->";
  return slice;
});
Creating a WordPress page with some additional WordPress meta-data works the same way:
const slice = sliceFactory.createSlice("content-exporter", (factory, slice) => {
  slice.data.posts[0].title = "Hello";
  slice.data.posts[0]["wp:post_type"] = "page";
  slice.data.posts[0]["wp:post_excerpt"] = "A page about my friend";
  slice.data.posts[0]["wp:post_content"] =
    "<!-- wp:paragraph --><p>Hello my my friend</p><!-- /wp:paragraph -->";
  return slice;
});
Encapsulate WordPress attachments like images into ImpEx JSON
Creating the JSON for a WordPress attachment is even dead simple :
// declares a attachment for image './foo.jpg'
const slice = sliceFactory.createSlice("attachment", (factory, slice) => {
  slice.data = "./foo.jpg";

  return slice;
});
In most cases, our imported content (aka posts/pages) will reference the media in various ways like /image/foo.jpg or ../../images/foo.jpg and so on.
ImpEx WordPress plugin will take care about replacing image references in Gutenberg block annotated HTML if we provide a replacement hint impex:post-references (see Attachments (like Pictures and Videos) for details).
const slice = sliceFactory.createSlice("attachment", (factory, slice) => {
  slice.data = "./foo.jpg";
  // will result in replacing all matching references in posts of the WordPress instance with the link to the imported image
  slice.meta["impex:post-references"] = [
    "/image/foo.jpg",
    "../../images/foo.jpg",
  ];

  return slice;
});
Generate filenames for the JSON slice data in ImpEx Export format
The ImpEx WordPress plugin imports and exports data into a directory structure according to the ImpEx Export format.
@cm4all-wp-impex/generator supports creating the correct paths by providing a static generator function SliceFactory.PathGenerator().
This function returns a Generator function yielding a new relative path each time it's next() function is called.
The optional SliceFactory.PathGenerator(max_slices_per_chunk : integer = 10) function parameter may be used to limit the number of slices per chunk directory to a custom value.
import { ImpexSliceFactory } from "@cm4all-wp-impex/generator";
...

const pathGenerator = ImpexSliceFactory.PathGenerator();
...

// 2  => only 2 slice files per chunk directory
const gen = SliceFactory.PathGenerator(2);

console.log(gen.next().value); // => "chunk-0001/slice-0001.json"
console.log(gen.next().value); // => "chunk-0001/slice-0002.json");
console.log(gen.next().value); // => "chunk-0002/slice-0001.json");
console.log(gen.next().value); // => "chunk-0002/slice-0002.json");
console.log(gen.next().value); // => "chunk-0003/slice-0001.json");
console.log(gen.next().value); // => "chunk-0003/slice-0002.json");
...
See tests and static website transformation example for real world usage.
Migrate existing ImpEx export
The migrate export provides you the option to transform existing ImpEx export data with minimal boilerplate code.
Example use case : Suppose you want to transform your WordPress pages created using a Pagebuilder like Elementor into true Gutenberg pages ...
-
Import the migrate function from the package using the following snippet:
import { migrate } from "@cm4all-wp-impex/generator"; -
Synopsis :
async migrate(sourcePath, targetPath, sliceCallback, options = {})The function traverses all ImpEx chunk sub directories and delegates the found slice files to the given callback argument.
Slice files will be delegated to the callback ordered by sub chunk directory name and slice file name.
Arguments:
-
sourcePath: stringpath to an ImpEx export directory containing the exported data to transform
-
targetPath: stringDirectory to write the transformed ImpEx export to. Will be created if it does not exist.
-
sliceCallback: functionA callback function called for every ImpEx slice file.
The provided callback can handle (transform its content into one or more target slice files or just suppress it) the slice file by itself and return a truthy value.
Otherwise the
migratefunctions default mechanism will taken into account and the slice will be copied to the target directory including subsidiary file(s) in case of a attachment slice.A
asynccallback as argument is also supported.Arguments:
-
slicePath: stringThe absolute path to the the current slice file. It's up to the callback to load/parse/process the slice JSON file.
-
pathGenerator:SliceFactory.PathGeneratorAn preconfigured instance of
SliceFactory.PathGeneratorprovided by this package. Using thepathGeneratorallows you to generate valid ImpEx target slice file paths. -
targetPath: stringThe path of the resulting ImpEx export directory.
-
options: objectThe options object provided to the
migratefunction.
Return:
-
truthy
migrateassumes the slice was already consumed/processed by the callback -
falsy the
migratealorithm will copy the slice (and associated files in case of a attachment slice) to the target directory
-
-
options: objectAn optional argument to customize the
migratefunction behaviour.Keys :
-
onStart: functionWill be called right before
migratewill call thesliceCallbackthe first time.If the ImpEx export is empty (=> no slice files in the export directory) the
onStartcallback will never be called.A
asyncfunction callback is supported. -
onFinish: functionWill be called after
migratehas called thesliceCallbackthe last time.If the ImpEx export is empty (=> no slice files in the export directory) the
onFinishcallback will never be called.A
asyncfunction callback is supported.
-
-
Example migrate usage
- strip out any content of an ImpEx export except attachment posts (Images/Videos) using
migrate.
await migrate(
  './my-impex-export',
  './my-migrated-impex-export',
  async (slicePath) => {
    const slice = JSON.parse(readFile(slicePath));

    // return truthy for all slices except attachments
    return slice.tag!=='attachment';
  }
);
Checkout the package test cases for further usage examples.
Static website conversion tutorial
This chapter features the conversion of a static HTML website to a WordPress site using @cm4all-wp-impex/generator and ImpEx WordPress Plugin.
The sources can be found at the ImpEx WordPress plugin GitHub repository.
- About
- Conversion process
- Whats missing ?
- Local Development using cm4all-wp-impex
- Full conversion script
About
This is a full featured example of converting a regular static website of a fictional german dentist to a WordPress site.
The web site is available offline at directory ./homepage-dr-mustermann.
You can view the website by
- starting the PHP built-in webserver :
php -S localhost:8080 -t homepage-dr-mustermann/ - and open the website in your browser :
http://localhost:8080/.
Watch the walk-trough on YouTube
(German audio with english sub titles.)
Conversion process
The conversion process is implemented in a single file ./index.js :
-
scanning for html and media files from the filesystem using plain NodeJS
-
converting the HTML files to ImpEx slice JSON using
ImpexTransformerandImpexSliceFactoryfrom package@cm4all-wp-impex/generator. The HTML transformation is customized in thesetup(...)function. -
creating ImpEx slice JSON for the media files using
ImpexSliceFactoryfrom package@cm4all-wp-impex/generator -
saving the ImpEx slice JSON to the filesystem using paths generated by
ImpexSliceFactory.PathGeneratorfrom package@cm4all-wp-impex/generator- the media files are saved to the filesystem using paths adapted from the
ImpexSliceFactory.PathGeneratorgenerated paths for the slice files (as expected by the ImpEx Export format).
- the media files are saved to the filesystem using paths adapted from the
The conversion process is implemented in less than 240 lines of code thanks to package @cm4all-wp-impex/generator.
You can run the conversion script by executing ./index.js (can be found at the GitHub repository : packages/@cm4all-wp-impex/generator/examples/impex-complete-static-homepage-conversion\index.js
Ensure the right nodejs version is active before using
nvm installand to install the required NodeJS dependencies usingnpm ci.
Ensure that you've installed the script dependencies by entering directory
cm4all-wp-impex/packages/@cm4all-wp-impex/generatorand executingnpm ci.
The result is a folder generated-impex-import/ containing the generated ImpEx export folder layout containing the ImpEx slice JSON files and media files.
This export can now be imported into WordPress using ImpEx CLI :
impex-cli.php import -username=<adminusername> -password=<adminpassword> -rest-url=<your-wordpress-rest-api-endpoint> ./generated-impex-export/
(Replace the <placeholder> with your own values.)
Ensure your WordPress instance is empty (does not contain any pages/posts/media).
After executing the command the website contents are imported into your WordPress instance.
The example website and conversion script is intentionally simple.
Since every website is different, the conversion process cannot be universal work for every website.
By implementing additional transformation rules using the hooks known by Transformer.setup(...) function of @cm4all-wp-impex/generator almost any detail of a website can be converted to a WordPress post/page.
Whats missing ?
The example does not cover every detail of a website conversion, only the content. But that's intentional.
Possible improvements:
-
The navigation bar could be converted to a custom WordPress nav_menu.
Navigation is different handled in FSE and classic themes. In a FSE you would generate a Navigation block, in a classic theme it works different. It depends on the target WordPress environment how to take over navigation.
-
Styles are ignored in the example.
Because it depends on the goal of the transformation. If the content should be styled completely by a WordPress theme providing the complete styling, this is not needed.
But if needed, style properties like fonts and colors could be introspected and transformed to FSE theme.json settings.
-
Contact form will be taken over as
core/htmlblock. Submitting the form does not work in the example.WordPress/Gutenberg does not provide a generic Form block. There is no option to convert the HTML form to something matching using plain WordPress / Gutenberg.
But the form could be easily converted into a Ninja Form or any other form builder plugin available for WordPress.
To keep the example simple and working without depending on additional plugins like Ninja Forms the example ist just converted to a
core/htmlblock.So it depends on your target WordPress environment (and available plugins) how the conversion will be implemented.
-
The overall layout (header/footer/main section) is also ignored (but could be converted to FSE part templates).
But : as you might guess - all these improvements may vary depending on the goal.
The important message is : Everything is possible, but because it's individual - it's up to you 💪
Local Development using cm4all-wp-impex
-
(optional) cleanup local wp-env installation :
(cd $(git rev-parse --show-toplevel) && make wp-env-clean) -
import using ImpEx cli :
$(git rev-parse --show-toplevel)/impex-cli/impex-cli.php import -username=admin -password=password -rest-url=http://localhost:8888/wp-json -profile=all ./generated-impex-export/
Full conversion script
#!/usr/bin/env node

/*
 *  @cm4all-wp-impex/generator usage example converting a whole static homepage to an impex export
 */

import { resolve, join, extname, dirname, basename } from "path";
import { readdir, readFile, mkdir, rm, writeFile, copyFile } from "fs/promises";
import { ImpexTransformer, ImpexSliceFactory } from "../../src/index.js";

/**
 * STATIC_HOMEPAGE_DIRECTORY is the directory containing the static homepage
 */
const STATIC_HOMEPAGE_DIRECTORY = new URL(
  "homepage-dr-mustermann",
  import.meta.url
).pathname;

/**
 * generator function yielding matched files recursively
 *
 * @param   {string}  dir directory to search
 * @param   {boolean} recursive  whether to search recursively
 * @param   {string|undefined}  extension file extension to match or null to match all files
 *
 * @yields  {string} path to file
 */
async function* getFiles(dir, recursive, extension) {
  const entries = await readdir(dir, { withFileTypes: true });
  for (const entry of entries) {
    const res = resolve(dir, entry.name);
    if (entry.isDirectory()) {
      yield* getFiles(res, recursive, extension);
    } else if (!extension || entry.name.endsWith(extension)) {
      yield res;
    }
  }
}

/**
 * keeps track of images and their references from html files (aka pages)
 * key is image path relative to STATIC_HOMEPAGE_DIRECTORY
 * value is array of image references
 */
const img2imgSrc_mappings = {};

/**
 * set up the ImpexTransformer singleton
 *
 * @return  {ImpexSliceFactory}
 */
function setup() {
  ImpexTransformer.setup({
    onDomReady(document, options = { path: null }) {
      // replace <header> elements with the <ul> child
      for (const section of document.querySelectorAll("header")) {
        const ul = document.querySelector("ul.pure-menu-list");
        section.replaceWith(ul.cloneNode(true));
      }

      // replace <section> elements with its inner contents
      for (const section of document.querySelectorAll("section")) {
        for (const child of section.childNodes) {
          section.parentNode.insertBefore(child.cloneNode(true), section);
        }
        section.remove();
      }

      // replace <footer> elements with <p>
      for (const footer of document.querySelectorAll("footer")) {
        const paragraph = document.createElement("p");
        //paragraph.setAttribute("class", "footer");
        paragraph.innerHTML = footer.innerHTML;
        footer.replaceWith(paragraph);
      }

      if (options?.path) {
        // grab all image references and remember them for later processing
        for (const img of document.querySelectorAll("img")) {
          const src = img.getAttribute("src");

          // compute image path relative to static webpage directory
          const imgPath = resolve(
            join(STATIC_HOMEPAGE_DIRECTORY, src)
          ).substring(STATIC_HOMEPAGE_DIRECTORY);

          // add reference to image path
          (
            img2imgSrc_mappings[imgPath] || (img2imgSrc_mappings[imgPath] = [])
          ).push(src);
        }
      }
    },
  });
  return new ImpexSliceFactory();
}

async function main() {
  // setup ImpexTransformer singleton and get a ImpexSliceFactory instance
  const impexSliceFactory = setup();

  // group files by type (html or attachment)
  const attachmentResources = [];
  const htmlResources = [];

  // iterate over all files recursively in STATIC_HOMEPAGE_DIRECTORY
  for await (const res of getFiles(STATIC_HOMEPAGE_DIRECTORY, true)) {
    const resource = res.toString();

    switch (extname(res)) {
      // stick HTML files into htmlResources
      case ".html":
        htmlResources.push({ resource });
        console.log("HTML %s", resource);
        break;
      // stick media files into attachmentResources
      case ".jpeg":
      case ".jpg":
      case ".gif":
      case ".png":
        attachmentResources.push({ resource });
        console.log("ATTACHMENT %s", resource);
        break;
    }
  }

  // get a generator function yielding ImpEx export format conformant paths
  const slicePathGenerator = ImpexSliceFactory.PathGenerator();

  // compute target directory
  const IMPEX_EXPORT_DIR = new URL("generated-impex-export", import.meta.url)
    .pathname;

  // delete already existing directory if it exists
  try {
    await rm(IMPEX_EXPORT_DIR, { recursive: true });
  } catch {}

  // create target directory
  await mkdir(IMPEX_EXPORT_DIR, { recursive: true });

  // convert html files to gutenberg annotated block content
  for (const htmlResource of htmlResources) {
    // transform html body to gutenberg annotated block content
    htmlResource.content = ImpexTransformer.transform(
      await readFile(htmlResource.resource, "utf8"),
      { path: htmlResource.resource }
    );
    // remember html metadata for later processing
    htmlResource.title =
      document.querySelector("head > title")?.textContent ?? "";
    htmlResource.description =
      document
        .querySelector('head > meta[name="description"]')
        ?.getAttribute("content") ?? "";
    htmlResource.keywords = (
      document
        .querySelector('head > meta[name="keywords"]')
        .getAttribute("content") ?? ""
    )
      .toLowerCase()
      .split(" ");

    // create ImpEx slice json content for this html file
    const slice = impexSliceFactory.createSlice(
      "content-exporter",
      (factory, slice) => {
        slice.data.posts[0]["wp:post_type"] = "page";
        slice.data.posts[0].title = htmlResource.title;
        slice.data.posts[0]["wp:post_excerpt"] = htmlResource.title;
        slice.data.posts[0]["wp:post_content"] = htmlResource.content;
        // @TODO: categories (aka keywords)
        // @TODO: add navigation
        return slice;
      }
    );

    // compute ImpEx conform slice json file path
    const slicePath = join(IMPEX_EXPORT_DIR, slicePathGenerator.next().value);
    await mkdir(dirname(slicePath), {
      recursive: true,
    });

    // write json to file
    await writeFile(slicePath, JSON.stringify(slice, null, 2));
  }

  // make media files available as ImpEx slices
  for (const attachmentResource of attachmentResources) {
    // create ImpEx slice json content for this media file
    const slice = impexSliceFactory.createSlice(
      "attachment",
      (factory, slice) => {
        // apply relative path as content
        slice.data = attachmentResource.resource.substring(
          IMPEX_EXPORT_DIR.length + 1
        );

        // compute unique image file=>[img[@src]] mapping for this attachment
        let img2imgSrc_mapping = [
          ...new Set(img2imgSrc_mappings[attachmentResource.resource] ?? []),
        ];

        // add mapping to slice metadata
        slice.meta["impex:post-references"] = img2imgSrc_mapping;

        return slice;
      }
    );

    // compute ImpEx conform slice json file path
    const slicePath = join(IMPEX_EXPORT_DIR, slicePathGenerator.next().value);
    await mkdir(dirname(slicePath), {
      recursive: true,
    });

    // write slice json to file
    await writeFile(slicePath, JSON.stringify(slice, null, 2));

    // copy attachment file to target directory with ImpEx conform file name
    await copyFile(
      attachmentResource.resource,
      slicePath.replace(".json", "-" + basename(attachmentResource.resource))
    );
  }

  // JSDOM is preventing automatic process termination so we need to force it
  process.exit(0);
}

main();
The script is also available at ImpEx WordPress plugin GitHub repository
API
Configuration
REST API
All ImpEx features are exposed by it's WordPress REST API endpoint.
See ImpEx REST API documentation.
The REST API is also available as OpenAPI Specification Format : Download ImpEx OpenAPI Specification here.
You can explore the ImpEx Rest API using any HTTP Rest API Client.
Our favorite is the "WP API SwaggerUI" WordPress Plugin since it's perfectly integrated into WordPress.
Usage
ImpEx supports out of the box the export/import of
-
content (posts/pages/nav_menu and media assets)
-
FSE content (Full Site Editing assets like block patterns, templates, template parts, reusable blocks and theme settings)
For everything else (third-party plugin settings for example) you can provide custom export/import profile(s).
Configuration
ImpEx can be customized by providing Profiles.
An Export profile defines the WordPress data to export.
An Import profile declares how and which export data could be imported.
Custom profile configuration
Profiles are configured and registered using a custom ImpEx WordPress action :
\add_action('cm4all_wp_impex_register_profiles', function () {
  // your ImpEx profile registration goes here
  ...
});
Using a WordPress action for ImpEx profile registration guarantees that the action callback is only executed if the ImpEx plugin is activated.
Implementing a ImpEx profile in your WordPress code does not make ImpEx a required dependency for your plugin since the code is only executed if ImpEx is installed and active.
Export
Let's say you want to export the core WordPress contents (pages/posts/attachments and stuff) but also
-
Ninja Forms Contact Form contents and settings
-
Ultimate Maps by Supsystic contents and settings
-
Complianz GDPR contents and settings
-
and a few options of your own plugin
To do so you need to create a Export profile.
Fortunately ImpEx already provides some low level building blocks called ExportProvider to make our ImpEx Profile declaration piece of cake :
\add_action('cm4all_wp_impex_register_profiles', function () {
  // ensure admin plugin functions are available
  require_once(ABSPATH . 'wp-admin/includes/plugin.php');

  // register a new export profile with a unique name
  $profile = Impex::getInstance()->Export->addProfile('impex-export-profile-example');
  // give the profile a senseful description
  $profile->setDescription('Exports posts/pages/media-assets and plugin data of complianz-gdpr,ninja-forms and ultimate-maps-by-supsystic');

  // export pages/posts/comments/block patterns/templates/template parts/reusable blocks
  $profile->addTask(
    'wordpress content',
    cm4all\wp\impex\ContentExporter::PROVIDER_NAME
  );

  // export media
  $profile->addTask(
    'wordpress attachments (uploads)',
    cm4all\wp\impex\AttachmentsExporter::PROVIDER_NAME
  );

  // export ninja-forms related tables/options if active
  $plugin_ninjaforms_disabled = !is_plugin_active("ninja-forms/ninja-forms.php");
  $profile->addTask(
    "ninja-forms db tables (nf3_*)",
    cm4all\wp\impex\DbTablesExporter::PROVIDER_NAME,
    // ninja-forms stores data in custom tables prefixed with 'nf_3'
    [cm4all\wp\impex\DbTablesExporter::OPTION_SELECTOR => 'nf3_*']
  )->disabled = $plugin_ninjaforms_disabled;
  $profile->addTask(
    'ninja-forms wp_options',
    cm4all\wp\impex\WpOptionsExporter::PROVIDER_NAME,
    // ninja-forms stores it options prefixed with 'ninja_*', 'nf_*', 'wp_nf_*', 'widget_ninja_*'
    [
      cm4all\wp\impex\WpOptionsExporter::OPTION_SELECTOR => ['ninja_*', 'nf_*', 'wp_nf_*', 'widget_ninja_*']
    ]
  )->disabled = $plugin_ninjaforms_disabled;

  // export ultimate_maps related tables/options
  $plugin_ultimatemaps_disabled = !is_plugin_active("ultimate-maps-by-supsystic/ums.php");
  $profile->addTask(
    "ultimate_maps db tables (ums_*)",
    cm4all\wp\impex\DbTablesExporter::PROVIDER_NAME,
    // ultimate maps stores data in custom tables prefixed with 'ums_'
    [cm4all\wp\impex\DbTablesExporter::OPTION_SELECTOR => 'ums_*']
  )->disabled = $plugin_ultimatemaps_disabled;
  $profile->addTask(
    'ultimate_maps wp_options',
    cm4all\wp\impex\WpOptionsExporter::PROVIDER_NAME,
    // ultimate maps stores data in wp options prefixed with 'ums_*', 'wp_ums_*'
    [
      cm4all\wp\impex\WpOptionsExporter::OPTION_SELECTOR => ['ums_*', 'wp_ums_*']
    ]
  )->disabled = $plugin_ultimatemaps_disabled;

  // export complianz related tables/options
  $plugin_complianz_disabled = !is_plugin_active("complianz-gdpr/complianz-gpdr.php");
  $profile->addTask(
    "complianz-gdpr db tables",
    cm4all\wp\impex\DbTablesExporter::PROVIDER_NAME,
    // complianz stores data in custom tables prefixed with 'cmplz_*'
    [DbTablesExporter::OPTION_SELECTOR => 'cmplz_*',]
  )->disabled = $plugin_complianz_disabled;
  $profile->addTask(
    'complianz-gdpr wp_options',
    cm4all\wp\impex\WpOptionsExporter::PROVIDER_NAME,
    // complianz stores data in wp options prefixed with 'cmplz_*', 'complianz_*'
    [
      cm4all\wp\impex\WpOptionsExporter::OPTION_SELECTOR => ['cmplz_*', 'complianz_*']
    ]
  )->disabled = $plugin_complianz_disabled;
});
Caveat: Do not provide the WordPress database table prefix (default is
wp_) to thecm4all\wp\impex\WpOptionsExporter::OPTION_SELECTORoption since it may vary on installations. thecm4all\wp\impex\WpOptionsExporterwill take care of that.
That's it !
Now you can trigger the export using this ImpEx export configuration in the ImpEx screen at WP dashboard (or even using the ImpEx CLI)
Import
Thanks to ImpEx architecture you normally don't need to define a custom import configuration.
ImpEx sports a generic all import provider and profile importing anything exported using the ImpEx building blocks.
As long as you use the Exporter provided by ImpEx in your custom Export profile, you don't need to define an matching custom import profile.
In rare cases you need to execute PHP code after the import to get everything working.
In our export profile example above we implemented support for Ninja Forms Contact Form. Unfortunately the forms will be in maintenance mode after importing them.
To fix this we need to execute some PHP code (WPN_Helper::set_forms_maintenance_mode(0) from the Ninja Forms Contact Form Plugin) after the import.
ImpEx provides Events for exactly that purpose :
\add_action('cm4all_wp_impex_register_profiles', function () {
  // ensure admin plugin functions are available
  require_once(ABSPATH . 'wp-admin/includes/plugin.php');

  // get the 'all' profile
  $profile = Impex::getInstance()->Import->getProfile('all');

  // attach a listener callback for the `EVENT_IMPORT_END` event
  $profile->events(ImpexImport::EVENT_IMPORT_END)->addListener(
    'reset ninja forms mainentance mode',
    fn () => method_exists('WPN_Helper', 'set_forms_maintenance_mode') && WPN_Helper::set_forms_maintenance_mode(0)
  );
});
Tada - that's it !
There ist just one caveat ... what if the ImpEx 'all' profile gets disabled by someone else ? To work around this we can also introduce a custom import profile utilizing the 'all' import provider:
\add_action('cm4all_wp_impex_register_profiles', function () {
  // ensure admin plugin functions are available
  require_once(ABSPATH . 'wp-admin/includes/plugin.php');

  // create a new import profile
  $profile = Impex::getInstance()->Import->addProfile('impex-import-profile-example');
  $profile->setDescription('Import everything example with event listener');

  // reuse the 'all' import provider registered by the 'all' import profile
  $profile->addTask('main', Impex::getInstance()->Import->getProvider('all')->name);

  // attach a listener callback for the `EVENT_IMPORT_END` event
  $profile->events(ImpexImport::EVENT_IMPORT_END)->addListener(
    'reset ninja forms mainentance mode',
    fn () => method_exists('WPN_Helper', 'set_forms_maintenance_mode') && WPN_Helper::set_forms_maintenance_mode(0)
  );
});
WordPress Filters
ImpEx supports various WordPress filters for customizing ImpEx.
Import
impex_import_filter_profiles
Using this filter you can hide ImpEx import profiles from the user.
An example : To hide the ImpEx import profile all you need to add the following WordPress filter to your sources :
\add_filter(
  'impex_import_filter_profiles',
  fn( $profiles ) => array_filter(
    $profiles,
    fn($profile) => $profile->name !== 'all'
  ),
);
Export
impex_export_filter_profiles
Using this filter you can hide ImpEx export profiles from the user.
An example : To hide the ImpEx export profile base you need to add the following WordPress filter to your sources :
\add_filter(
  'impex_export_filter_profiles',
  fn( $profiles ) => array_filter(
    $profiles,
    fn($profile) => $profile->name !== 'base'
  ),
);
cm4all-wp-impex REST API
Version v1
Path Table
Reference Table
| Name | Path | Description |
|---|---|---|
| postCm4allWpImpexV1Import | #/components/requestBodies/postCm4allWpImpexV1Import | |
| postCm4allWpImpexV1Export | #/components/requestBodies/postCm4allWpImpexV1Export | |
| basic | #/components/securitySchemes/basic |
Path Details
[GET]/cm4all-wp-impex/v1/export/profile/schema
- Security
basic
Responses
-
200 OK
-
400 Bad Request
-
404 Not Found
[GET]/cm4all-wp-impex/v1/export/profile
- Security
basic
Responses
-
200 OK
-
400 Bad Request
-
404 Not Found
[GET]/cm4all-wp-impex/v1/export/profile/{name}
- Security
basic
Parameters(Query)
context?: string
Responses
-
200 OK
-
400 Bad Request
-
404 Not Found
[GET]/cm4all-wp-impex/v1/import/profile/schema
- Security
basic
Responses
-
200 OK
-
400 Bad Request
-
404 Not Found
[GET]/cm4all-wp-impex/v1/import/profile
- Security
basic
Responses
-
200 OK
-
400 Bad Request
-
404 Not Found
[GET]/cm4all-wp-impex/v1/import/profile/{name}
- Security
basic
Parameters(Query)
context?: string
Responses
-
200 OK
-
400 Bad Request
-
404 Not Found
[GET]/cm4all-wp-impex/v1/export/schema
- Security
basic
Responses
-
200 OK
-
400 Bad Request
-
404 Not Found
[GET]/cm4all-wp-impex/v1/export
- Security
basic
Responses
-
200 OK
-
400 Bad Request
-
404 Not Found
[POST]/cm4all-wp-impex/v1/export
- Security
basic
RequestBody
- multipart/form-data
{
  // The options used to create the export.
  options?: string
  // The name of the export profile to use.
  profile?: string
  // The human readable name of the export
  name?: string
  // The human readable description of the export
  description?: string
}
Responses
-
200 OK
-
400 Bad Request
-
404 Not Found
[GET]/cm4all-wp-impex/v1/export/{id}
- Security
basic
Parameters(Query)
context?: string
Responses
-
200 OK
-
400 Bad Request
-
404 Not Found
[POST]/cm4all-wp-impex/v1/export/{id}
- Security
basic
RequestBody
- multipart/form-data
{
  // The options used to create the export.
  options?: string
  // The name of the export profile to use.
  profile?: string
  // The human readable name of the export
  name?: string
  // The human readable description of the export
  description?: string
}
Responses
-
200 OK
-
400 Bad Request
-
404 Not Found
[PUT]/cm4all-wp-impex/v1/export/{id}
- Security
basic
Parameters(Query)
options?: string
profile?: string
name?: string
description?: string
Responses
-
200 OK
-
400 Bad Request
-
404 Not Found
[PATCH]/cm4all-wp-impex/v1/export/{id}
- Security
basic
Parameters(Query)
options?: string
profile?: string
name?: string
description?: string
Responses
-
200 OK
-
400 Bad Request
-
404 Not Found
[DELETE]/cm4all-wp-impex/v1/export/{id}
- Security
basic
Parameters(Query)
force?: string
Responses
-
200 OK
-
400 Bad Request
-
404 Not Found
[GET]/cm4all-wp-impex/v1/export/{id}/slice
- Security
basic
Parameters(Query)
context?: string[]
page?: string
per_page?: string
offset?: string
Responses
-
200 OK
-
400 Bad Request
-
404 Not Found
[GET]/cm4all-wp-impex/v1/import/schema
- Security
basic
Responses
-
200 OK
-
400 Bad Request
-
404 Not Found
[GET]/cm4all-wp-impex/v1/import
- Security
basic
Responses
-
200 OK
-
400 Bad Request
-
404 Not Found
[POST]/cm4all-wp-impex/v1/import
- Security
basic
RequestBody
- multipart/form-data
{
  // The options used to create the import.
  options?: string
  // The name of the import profile to use.
  profile?: string
  // The name of the import
  name?: string
  // The description of the import
  description?: string
}
Responses
-
200 OK
-
400 Bad Request
-
404 Not Found
[GET]/cm4all-wp-impex/v1/import/{id}
- Security
basic
Parameters(Query)
context?: string
Responses
-
200 OK
-
400 Bad Request
-
404 Not Found
[POST]/cm4all-wp-impex/v1/import/{id}
- Security
basic
RequestBody
- multipart/form-data
{
  // The options used to create the import.
  options?: string
  // The name of the import profile to use.
  profile?: string
  // The name of the import
  name?: string
  // The description of the import
  description?: string
}
Responses
-
200 OK
-
400 Bad Request
-
404 Not Found
[PUT]/cm4all-wp-impex/v1/import/{id}
- Security
basic
Parameters(Query)
options?: string
profile?: string
name?: string
description?: string
Responses
-
200 OK
-
400 Bad Request
-
404 Not Found
[PATCH]/cm4all-wp-impex/v1/import/{id}
- Security
basic
Parameters(Query)
options?: string
profile?: string
name?: string
description?: string
Responses
-
200 OK
-
400 Bad Request
-
404 Not Found
[DELETE]/cm4all-wp-impex/v1/import/{id}
- Security
basic
Parameters(Query)
force?: string
Responses
-
200 OK
-
400 Bad Request
-
404 Not Found
[POST]/cm4all-wp-impex/v1/import/{id}/slice
- Security
basic
RequestBody
- multipart/form-data
{
  // slice position column in database
  position: string
}
Responses
-
200 OK
-
400 Bad Request
-
404 Not Found
[POST]/cm4all-wp-impex/v1/import/{id}/consume
- Security
basic
RequestBody
- multipart/form-data
{
  // Offset at which to start consuming
  offset?: string
  // Lmit at which to end consuming
  limit?: string
}
Responses
-
200 OK
-
400 Bad Request
-
404 Not Found
[PUT]/cm4all-wp-impex/v1/import/{id}/consume
- Security
basic
Parameters(Query)
offset?: string
limit?: string
Responses
-
200 OK
-
400 Bad Request
-
404 Not Found
[PATCH]/cm4all-wp-impex/v1/import/{id}/consume
- Security
basic
Parameters(Query)
offset?: string
limit?: string
Responses
-
200 OK
-
400 Bad Request
-
404 Not Found
References
#/components/requestBodies/postCm4allWpImpexV1Import
- multipart/form-data
{
  // The options used to create the import.
  options?: string
  // The name of the import profile to use.
  profile?: string
  // The name of the import
  name?: string
  // The description of the import
  description?: string
}
#/components/requestBodies/postCm4allWpImpexV1Export
- multipart/form-data
{
  // The options used to create the export.
  options?: string
  // The name of the export profile to use.
  profile?: string
  // The human readable name of the export
  name?: string
  // The human readable description of the export
  description?: string
}
#/components/securitySchemes/basic
{
  "type": "http",
  "scheme": "basic"
}
Explanation of terms
ImpEx documentation often refers to special terms.
This page will clarify their meaning.
ImpEx
The name of the plugin stands for Import / Export => in short ImpEx.
Snapshot
A snapshot is a copy of the content to be imported/exported.
It resides in a separate WordPress database table managed by the ImpEx plugin.
Attachments/media will be saved in a private sub-directory of the WordPress uploads folder.
You can imagine a snapshot like a server side copy of the content.
You can import / export as many snapshots as you want.
Provider
Provider handle content for ImpEx. They are used to load (import) or extract (export) data for ImpEx.
There exist a set of standard providers brought by ImpEx for common WordPress data like posts, attachments, wp_options and database tables. Custom providers can be registered by the user.
ImpEx provider are basically callback functions called by ImpEx.
A provider gets registered with a unique name. The name is used to reference providers in a ImpEx profile.
There are two types of providers: Import and Export provider.
Export Provider
Export provider expose data as slices to ImpEx.
Because an Export provider may need to produce more than one slice per execution, the callback interface is designed as generator function.
In other words, an Export provider callback function gets called with a configuration and yields as many slices as needed. The configuration controls which data should be exported.
Take a look at the **WpOptionsExporterProviderCallback to see an example.
Import Provider
Import provider consume slices from ImpEx.
They work similarly to Export provider and get called with a configuration (controling what data should be imported from a slice) and a slice as parameter.
Since ImpEx does not know about how to handle a slice by itself, it delegates this task to the Import provider.
So an Import Provider checks if it can handle a slice by introspecting the slice meta-data. If it does, it handles the slice data and returns true if the slice was successfully imported.
In all other cases it returns false. In this case ImpEx will take the next Import provider in charge.
See __WpOptionsImportProviderCallback as an example
Profile
A profile consists of a list of tasks that are executed in the order they are registered.
Each task will reference a provider and it's configuration.
See
baseExport profile as example.
Profiles are used to programmatically compose the data to export (Export Profile) or to consume the data to import (Import Profile).
Furthermore a profile can configure event handler to be triggered in certain situations (like when the import was finished).
See ImpexImport::EVENT_IMPORT_END event usage for example
Chunk
When exporting a huge WordPress site with hundreds of posts and images, the result would be a directory with hundreds of files. To prevent File managers of crashing due to the amount of files, ImpEx splits the exported slice files into sub-directory chunks.
A chunk is sub-directory keeping a configurable unit of slices below the top level export directory. See an example export directory layout.
Slice
A slice is a self-containing JSON data structure of both data and its description (aka meta-data).
An example: a slice of WordPress posts will contain the posts (=> data) and the information thats needed to import the posts (=> meta-data like post title, author, ...).
The slice meta-data consist of a static part (semantic version, type of slice, ...) and a content related part contributed by the Export provider (entity type, any other meta data relevant for importing the data).
There is one special exception to the rule that a slice is self-contained : Attachment slices. Attachment slices are not self-contained because they contain binary data which cannot effectively stored within JSON.
The slice data are completely contributed by the Export provider.
See the Data files chapter for more information about the structure of a slice.
Slice files are strongly typed JSON structures. See the JSON schema definitions for standard ImpEx slice types in the ImpEx GitHub repository.
TransformationContext
TransformationContext transports contextual information's about the current import/export process. It's used to pass information from ImpEx to the Provider.
A TransformationContext is an internal data structure.
FAQ
Why is the ImpEx UI not (yet) working in Firefox / Brave ?
The ImpEx UI uses the File System Access API to export and import data to the local filesystem. This browser feature is mandatory.
Right now Chromium based browsers (except of Brave who disabled this feature) and Safari supporting the File System Access API.
As of now, it's unclear if and when Firefox will support the File System Access API.
As an alternative you can use the ImpEx CLI to trigger import/export operations on the commandline.
Ouch -your browser does not support the Crypto API
Same same as with the File System Access API API ... depending on your browser version the Crypto API feature we use (window.crypto.randomUUID) may not be supported by your browser.
As of now, all "green" browser support it.
But if you use an older version of a browser it might happen that Impex will not work since the browser feature is not available in your browser.